Shader后期处理-高斯模糊
高斯模糊
- 游戏中的后处理(一)高斯模糊
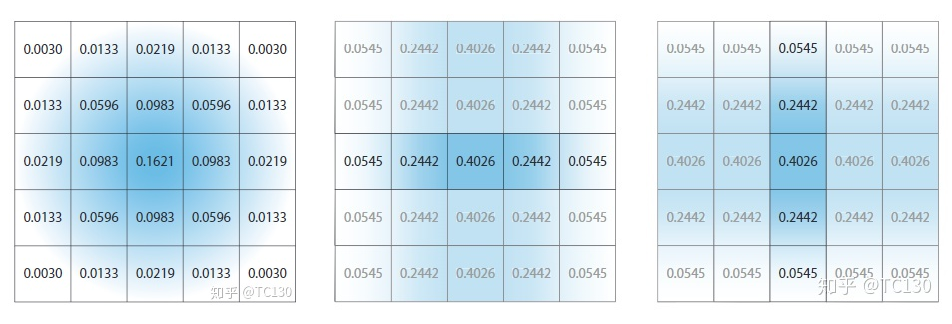
- 将计算出的高斯模糊的kernal,表示成两个向量的外积,然后分别进行处理
- 两次 spatial filter分别在水平和垂直方向上进行
- 尽管多使用了一个Pass,但是每个像素点需要的采样次数,从25降低到了10,在带宽开销上有了很大的降低
- 还可以通过双线性过滤的特性,来进一步降低采样次数
- 横向模糊与纵向模糊分别在两个片元着色器中实现

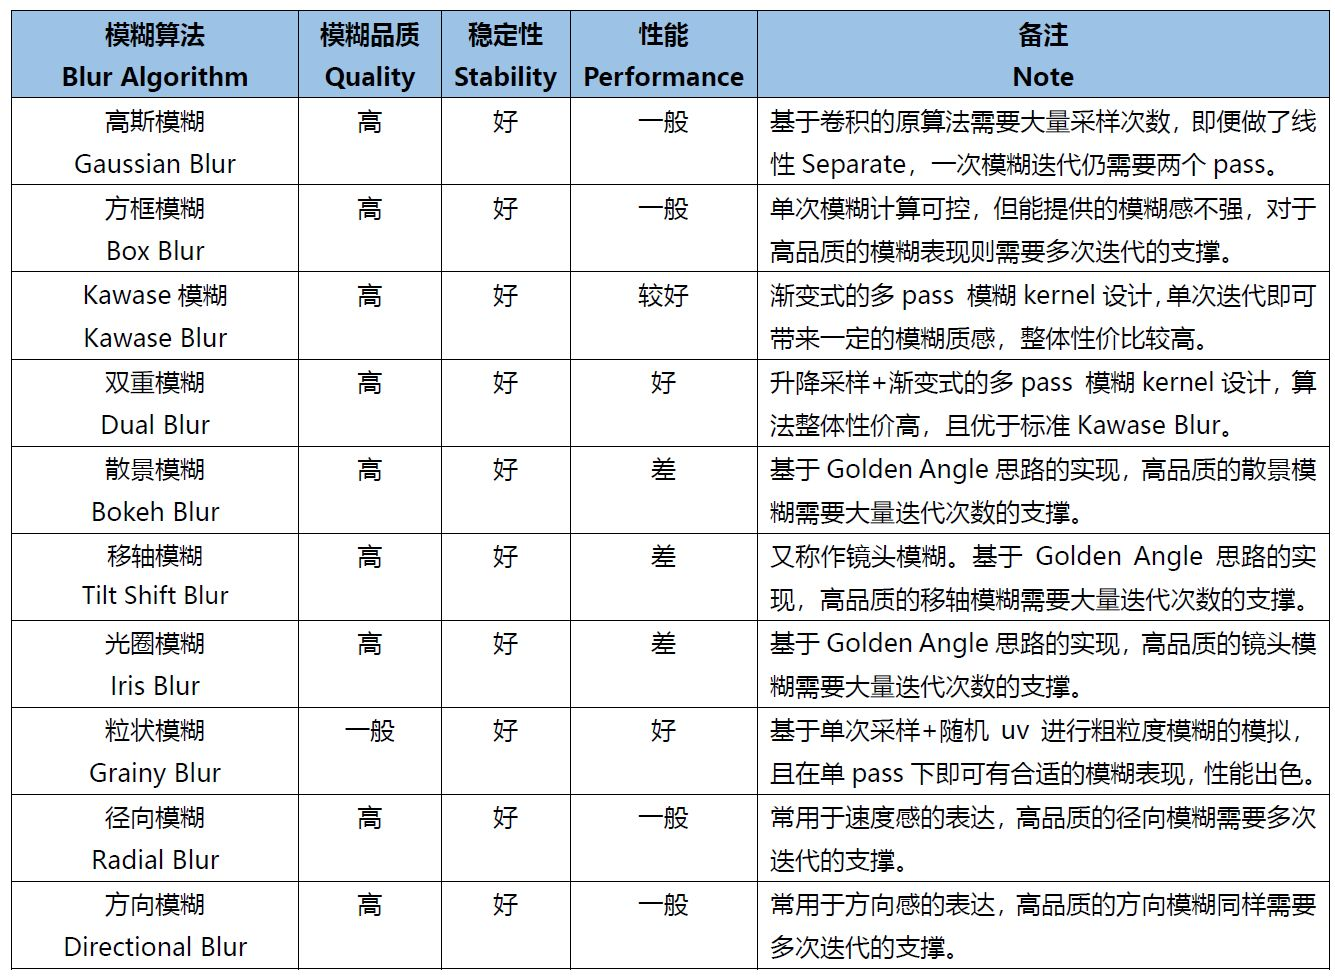
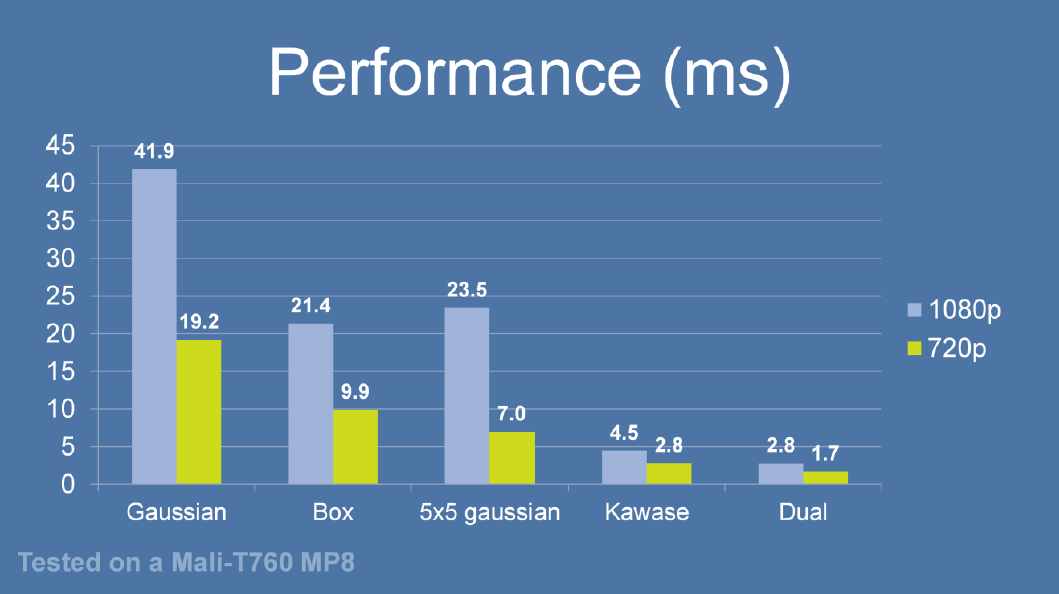
- 高品质后处理:十种图像模糊算法的总结与实现


代码
- 双Pass横向、纵向分开模糊
- Post_GaussianBlurPlus.shader
1
2
3
4
5
6
7
8
9
10
11
12
13
14
15
16
17
18
19
20
21
22
23
24
25
26
27
28
29
30
31
32
33
34
35
36
37
38
39
40
41
42
43
44
45
46
47
48
49
50
51
52
53
54
55
56
57
58
59
60
61
62
63
64
65
66
67
68
69
70
71
72
73
74
75
76
77
78
79
80
81
82
83
84
85
86
87
88
89
90
91
92
Shader "Post/Post_GaussianBlurPlus"
{
Properties
{
_MainTex ("Base (RGB)", 2D) = "white" {}
_BlurSize ("Blur Size", Float) = 1.0
}
SubShader
{
CGINCLUDE
#include "UnityCG.cginc"
sampler2D _MainTex;
half4 _MainTex_TexelSize;
float _BlurSize;
struct v2f
{
float4 pos : SV_POSITION;
half2 uv[5]: TEXCOORD0;
};
v2f vertBlurVertical(appdata_img v)
{
v2f o;
o.pos = UnityObjectToClipPos(v.vertex);
half2 uv = v.texcoord;
o.uv[0] = uv;
o.uv[1] = uv + float2(0.0, _MainTex_TexelSize.y * 1.0 * _BlurSize);
o.uv[2] = uv - float2(0.0, _MainTex_TexelSize.y * 1.0 * _BlurSize);
o.uv[3] = uv + float2(0.0, _MainTex_TexelSize.y * 2.0 * _BlurSize);
o.uv[4] = uv - float2(0.0, _MainTex_TexelSize.y * 2.0 * _BlurSize);
return o;
}
v2f vertBlurHorizontal(appdata_img v)
{
v2f o;
o.pos = UnityObjectToClipPos(v.vertex);
half2 uv = v.texcoord;
o.uv[0] = uv;
o.uv[1] = uv + float2(_MainTex_TexelSize.x * 1.0 * _BlurSize, 0.0);
o.uv[2] = uv - float2(_MainTex_TexelSize.x * 1.0 * _BlurSize, 0.0);
o.uv[3] = uv + float2(_MainTex_TexelSize.x * 2.0 * _BlurSize, 0.0);
o.uv[4] = uv - float2(_MainTex_TexelSize.x * 2.0 * _BlurSize, 0.0);
return o;
}
fixed4 fragBlur(v2f i) : SV_Target
{
const float weight[3] = {0.4026, 0.2442, 0.0545};
fixed3 sum = tex2D(_MainTex, i.uv[0]).rgb * weight[0];
UNITY_UNROLL
for (int it = 1; it < 3; it++)
{
sum += tex2D(_MainTex, i.uv[it * 2 - 1]).rgb * weight[it];
sum += tex2D(_MainTex, i.uv[it * 2]).rgb * weight[it];
}
return fixed4(sum, 1.0);
}
ENDCG
ZTest Always Cull Off ZWrite Off
Pass
{
// Pass0 纵向模糊
CGPROGRAM
#pragma vertex vertBlurVertical
#pragma fragment fragBlur
ENDCG
}
Pass
{
// Pass1 横向模糊
CGPROGRAM
#pragma vertex vertBlurHorizontal
#pragma fragment fragBlur
ENDCG
}
}
} - GaussianBlur.cs
1
2
3
4
5
6
7
8
9
10
11
12
13
14
15
16
17
18
19
20
21
22
23
24
25
26
27
28
29
30
31
32
33
34
35
36
37
38
39
40
41
42
43
44
45
46
47
48
49
50
51
52
53
54
55
56
57
58
59
60
61
62
63
64
65
66
using System;
using System.Collections;
using System.Collections.Generic;
using UnityEngine;
[ExecuteInEditMode]
[ImageEffectAllowedInSceneView]
[RequireComponent(typeof(Camera))]
public class GaussianBlur : MonoBehaviour
{
[SerializeField] private Shader shader;
[SerializeField] [Range(0, 10)] private int iterations = 3;
[SerializeField] [Range(0.2f, 3.0f)] private float blurSpread = 1.0f;
[SerializeField] [Range(1, 8)] private int downSample = 2;
private Material m_material;
private int m_blurSizeID;
void Awake()
{
m_material = new Material(shader);
m_blurSizeID = Shader.PropertyToID("_BlurSize");
}
void OnValidate()
{
if (shader)
m_material = new Material(shader);
}
void OnRenderImage(RenderTexture source, RenderTexture destination)
{
if (m_material != null)
{
int iWidth = source.width / downSample;
int iHeight = source.height / downSample;
RenderTexture buffer0 = RenderTexture.GetTemporary(iWidth, iHeight, 0);
Graphics.Blit(source, buffer0);
for (int i = 0; i < iterations; i++)
{
m_material.SetFloat(m_blurSizeID, 1.0f + blurSpread);
RenderTexture buffer1 = RenderTexture.GetTemporary(iWidth, iHeight, 0);
Graphics.Blit(buffer0, buffer1, m_material, 0);
RenderTexture.ReleaseTemporary(buffer0);
buffer0 = buffer1;
buffer1 = RenderTexture.GetTemporary(iWidth, iHeight, 0);
Graphics.Blit(buffer0, buffer1, m_material, 1);
RenderTexture.ReleaseTemporary(buffer0);
buffer0 = buffer1;
}
Graphics.Blit(buffer0, destination);
RenderTexture.ReleaseTemporary(buffer0);
}
else
{
Graphics.Blit(source, destination);
}
}
} - 单Pass横纵一体化模糊
1
2
3
4
5
6
7
8
9
10
11
12
13
14
15
fixed4 GaussianBlur(float2 uv, float blur)
{
const float offset = blur * 0.0625f;
fixed4 color = tex2D(_MainTex, float2(uv.x - offset, uv.y - offset)) * 0.0947416f;
color += tex2D(_MainTex, float2(uv.x, uv.y - offset)) * 0.118318f;
color += tex2D(_MainTex, float2(uv.x + offset, uv.y + offset)) * 0.0947416f;
color += tex2D(_MainTex, float2(uv.x - offset, uv.y)) * 0.118318f;
color += tex2D(_MainTex, float2(uv.x, uv.y)) * 0.147761f;
color += tex2D(_MainTex, float2(uv.x + offset, uv.y)) * 0.118318f;
color += tex2D(_MainTex, float2(uv.x - offset, uv.y + offset)) * 0.0947416f;
color += tex2D(_MainTex, float2(uv.x, uv.y + offset)) * 0.118318f;
color += tex2D(_MainTex, float2(uv.x + offset, uv.y - offset)) * 0.0947416f;
return color;
}
Explain
纹理过滤
- 最近点采样
- 直接取最接近的纹素进行采样
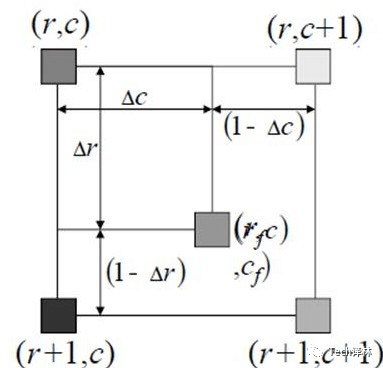
- 双线性过滤(Bilinear filtering)
- 效果上比较平滑
- 在X和Y方向分别进行一次线性插值, 采样点的权重与和插值点的距离负相关
- https://cloud.tencent.com/developer/article/1821913

- 三线性过滤
- 三线性过滤以双线性过滤为基础
- 对像素大小于纹素大小最接近的两层MipMap Level分别进行双线性过滤,然后再对两层得到的结果生成线性插值
- 在各向同性的情况下,三线性过滤能获得很不错的效果。
- https://www.cnblogs.com/anesu/p/15765137.html
- 各向异性过滤(Anisotropic Filtering)
- 按比例在各方向上采样不同数量的点来计算最终的结果
- 立方卷积插值(Bicubic)
- 取周围邻近的16个纹素的像素,然后做插值计算
- 不过并非是线性插值而是每次用4个做一个三次的插值。
- 光滑曲线插值(Quilez)
- 在立方卷积插值和双线性过滤的一个折中效果
- 将纹理坐标带入到双线性插值前额外做了一步处理。
Texture size
- _TexelSize
- x 1.0/width
- y 1.0/height
- z width
- w height
- https://docs.unity3d.com/Manual/SL-PropertiesInPrograms.html
- Direct3D平台下,如果我们开启了抗锯齿,则xxx_TexelSize.y 会变成负值
- UNITY_UV_STARTS_AT_TOP
- Direct3D类似平台使用1;OpenGL类似平台使用0
HDR Color
- _HDR
- DecodeHDR
参考
https://zhuanlan.zhihu.com/p/85210935
https://www.jianshu.com/p/e88193000d81
https://www.jianshu.com/p/e1cdb129b73e
Shader后期处理-高斯模糊
https://automask.github.io/wild/2021/06/17/lab/S_Unity_Post_Blur/